The best ski helmets, at three budgets
The best all-round ski helmet is the Giro Neo MIPS at under $100, an in-mould shell with a rotational-impact liner that is lighter and better vented than a hardshell at the same price. Every snow helmet sold in the US meets ASTM F2040, so certification is a floor rather than a differentiator: above the entry MIPS helmets you are buying weight, venting and fit consistency, not more protection.
The best ski helmet for most people is the Giro Neo MIPS at under $100, because it pairs a rotational-impact liner with an in-mould shell, which is lighter and better ventilated than the hardshell construction most budget helmets use. If you want to spend less, the OutdoorMaster ELK MIPS at under $100 is a certified MIPS helmet from a value brand. If you tour in terrain with rockfall or a bootpack, the POC Obex BC MIPS at under $500 is certified to both ski and mountaineering standards and is the only helmet here that covers the climb as well as the descent.
The reason this page is short on drama is that the safety question is genuinely settled by certification, and certification is a floor that every helmet on this page clears. What follows is about the things that do differ: whether the helmet has a rotational liner, whether it fits your head, whether it fits your goggles, and how much of a furnace it is on a spring afternoon.
What certification tells you, and what it does not
Every snow helmet sold in the United States meets ASTM F2040, and every one sold in Europe meets CE EN 1077. Both are pass-or-fail impact standards rather than scored ratings, which has an important consequence: there is no such thing as a helmet that passed by more. A sixty dollar helmet and a three hundred dollar helmet have both cleared the same bar.
What separates them, in descending order of how much you will notice:
| What differs | What it buys you | Worth paying for? |
|---|---|---|
| Rotational liner (MIPS and equivalents) | Reduces the rotational component of an angled impact, which is the mechanism associated with concussion | Yes, always. It adds under $50 and is the only item here that is about injury rather than comfort |
| Shell construction | In-mould bonds shell to foam and is lighter and better vented; ABS hardshell is heavier and takes dings better | Yes for weight and heat, no for protection |
| Fit consistency | Established brands make more sizes and hold shape tolerances better, so more heads find a genuinely snug fit | Yes, because fit is the variable that changes outcomes |
| Venting | Adjustable vents matter on spring afternoons and matter a great deal when touring uphill | Yes if you tour or ski in spring |
| Goggle integration | A brim shaped for the same brand's goggles leaves no forehead gap | Only if you already own that brand's goggles |
| Second certification (mountaineering) | Adds a penetration test for a sharp object on the crown, which is what rockfall is | Only if your objectives include a bootpack or climbing |
Note what is absent from that list: brand prestige, carbon fibre, and anything to do with how the helmet looks. None of those change the outcome of an impact.
<!-- gift-guides-xlink -->The picks, at three budgets
The ladder here is green circle, blue square, black diamond, the same three tiers used across this site. The green tier is the lowest total cost to a certified, MIPS-equipped helmet. The blue tier is the buy-once pick, where fit consistency and venting start to be worth money. The black tier is the performance ceiling, and it includes the answer for touring specifically.
Ski helmet picks

OutdoorMaster ELK MIPS Ski Helmet
- Rotational:
- MIPS
- Certification:
- ASTM F2040 and CE EN1077
- Fit:
- Dial adjust
A certified helmet with a rotational-impact liner for under seventy dollars. There is no version of this decision where saving thirty dollars by skipping MIPS is the right call.
Best for: A first helmet, a spare, and kitting out a family.
What it costs you: Heavier and warmer than a premium shell, with cruder venting. You will notice on a spring afternoon.
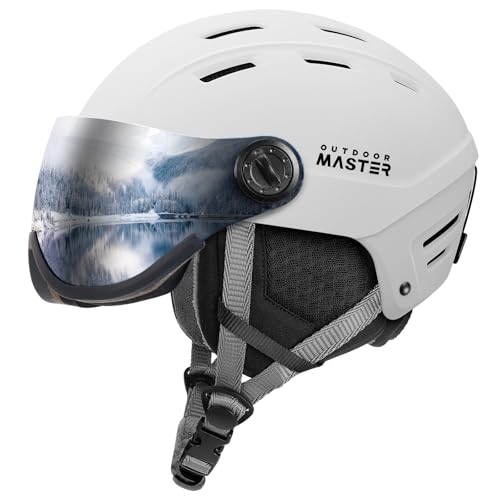
OutdoorMaster Ski Helmet with Detachable Visor
- Visor:
- Detachable
- Certification:
- ASTM F2040
- Use:
- Glasses wearers
A visor sits far enough off the face that prescription glasses fit under it without fogging against a goggle foam, which is the single most common complaint from skiers who wear glasses.
Best for: Glasses wearers and anyone who cannot get a goggle to seal on their face.
What it costs you: A visor is more exposed to scratches than a goggle lens and cannot be swapped as cheaply.

Giro Neo MIPS Snow Helmet
- Rotational:
- MIPS
- Construction:
- In-mould
- Fit:
- In Form dial
An in-mould shell from a helmet company, which buys real weight savings and better venting than an ABS hardshell at the same price. Fit consistency across sizes is where the established brands earn the money.
Best for: The default recommendation for most resort skiers.
What it costs you: In-mould shells take dings more visibly than hardshells. Cosmetic, mostly.
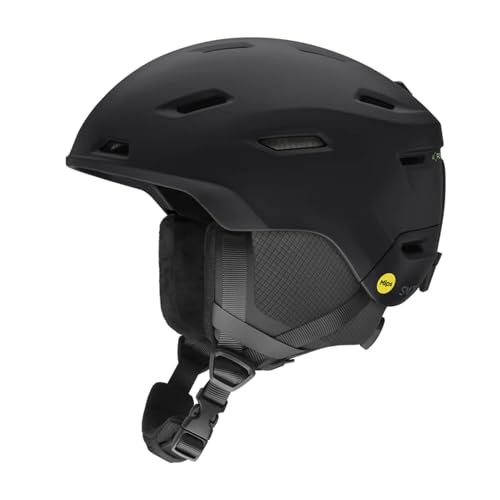
Smith Descend MIPS Helmet, matte black, large
- Rotational:
- MIPS
- Goggle:
- Smith integration
- Fit:
- Dial adjust
The goggle integration is the real argument: a helmet and goggle from the same maker leaves no gap on the forehead, and a gap there is the reason a lot of people ski with a cold stripe across their brow all day.
Best for: Anyone already in Smith goggles, and cold-weather resort skiing.
What it costs you: Priced well above the budget tier for a gain most skiers only notice in comfort, not in safety.

POC Fornix MIPS Ski Helmet
- Rotational:
- MIPS
- Shell:
- Aramid bridges, PC and EPS
- Fit:
- 360 degree adjust
Aramid bridges inside the liner spread load rather than letting the EPS crush locally. POC publishes more about its construction than almost anyone, which is the only honest basis for choosing a premium helmet.
Best for: A skier who wants the most protective construction available in a resort helmet.
What it costs you: Expensive, and every helmet on this page meets the same certification.

POC Obex BC MIPS Ski Helmet with RECCO
- Certification:
- Ski and climbing standards
- RECCO:
- Reflector built in
- Medical ID:
- NFC tag
Certified to both ski and mountaineering standards, so one helmet covers a bootpack with rockfall overhead and the ski down. The built-in RECCO reflector is a passive locator for organised rescue, and it is not a substitute for a beacon.
Best for: Touring and ski mountaineering, where a helmet has to do two jobs.
What it costs you: Do not read RECCO as avalanche safety. It only works with a rescue-service detector, which arrives long after a companion rescue would have mattered.
Specifications are the manufacturer's published figures, not measurements we took. Sizes, prices and stock change constantly, so confirm on the retailer page before buying. We earn commissions from Backcountry and from qualifying Amazon purchases, and every link on this page is one or the other. Where a Backcountry button reads "shop the category" it opens a search for that category rather than that exact model, so it finds comparable gear alongside it.
How we chose
We compared published certifications, published construction details, stated rotational-impact systems, size ranges and fit-system designs across every helmet in the range, then read verified owner reviews across retailers for the two things specifications never capture: whether a helmet runs hot, and whether it seals against common goggles without a gap.
We did not test these helmets in person, and we never will. Testing a helmet means destroying it in a laboratory against a defined standard, which is exactly what ASTM F2040 and CE EN 1077 already are, and any site claiming hands-on impact testing of a dozen ski helmets is telling you a story. What we can honestly do is read the standards, compare what makers publish, and be clear that fit is the variable you have to check yourself.
How to check the fit, in ninety seconds
- No hat. A thin liner is fine, a beanie is not. A helmet sized around a hat is loose the moment the hat comes off, and it will come off.
- Tighten the dial until snug, not pinching. The dial takes up slack; it does not fix a shell that is the wrong size.
- Shake your head hard, side to side and up and down. The helmet must move with your head, not slide on it. If you can rock it independently of your scalp, size down.
- Check the brow line. The front edge should sit one to two finger widths above your eyebrows. Higher than that and it is not protecting your forehead.
- Put your goggles on. There should be no gap between the goggle frame and the helmet brim. A gap is a cold stripe across your forehead for the entire day and a sign the two shapes do not match.
- Do the chin strap up and open your mouth wide. You should feel the strap pull slightly. Looser than that and the helmet can shift in a crash.
The cheapest protection in the sport is not a helmet
Worth saying on this page because it is where people arrive thinking about safety: for snowboarders specifically, the highest value-per-dollar protective item is not the helmet, it is a wrist guard. Wrist fractures are the most common snowboard injury by a wide margin, because a learning rider catches a heel edge, falls backwards and puts a hand down. A wrist guard worn under a glove costs under thirty dollars against the single most likely injury in the sport.
Protection worth adding
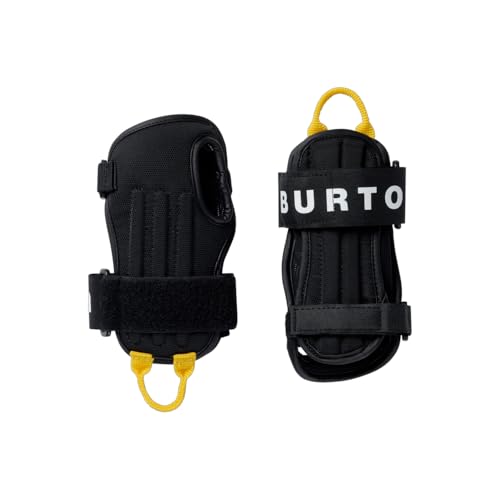
Burton Impact Wrist Guard
- Type:
- Wrist splint
- Fit:
- Under glove
- Use:
- Snowboarding
Wrist fractures are the most common snowboard injury by a wide margin, because a beginner falls backwards and puts a hand down. Twenty-seven dollars against the most likely injury in the sport is the best value purchase on this site.
Best for: Every learning snowboarder, without exception.
What it costs you: Slightly restricts wrist movement, which is the mechanism by which it works.

Qunature Ski Back Protector Vest
- Type:
- Vest with removable pad
- Fit:
- Under jacket
- Panel:
- Detachable
A back protector spreads impact across the panel instead of concentrating it on one vertebra. Park riders and anyone hitting features should wear one, and the removable panel means one vest for two use cases.
Best for: Park riding, and anyone skiing terrain where a backwards fall onto rock is plausible.
What it costs you: Warm, and does nothing for a rotational or compressive spinal injury.

RECCO Rescue Reflector
- Type:
- Passive reflector
- Power:
- None required
- Detection:
- RECCO detector only
A passive reflector that organised rescue services can detect with a RECCO unit. It needs no battery and never fails, and it is genuinely useful for locating a body in a tree well or a slide path.
Best for: Adding to a helmet or jacket that does not already have one.
What it costs you: This is NOT avalanche safety equipment and it does not replace a transceiver. It only works once a rescue team with a detector arrives, and companion rescue in the first fifteen minutes is what actually saves lives.
Specifications are the manufacturer's published figures, not measurements we took. Sizes, prices and stock change constantly, so confirm on the retailer page before buying. We earn commissions from Backcountry and from qualifying Amazon purchases, and every link on this page is one or the other. Where a Backcountry button reads "shop the category" it opens a search for that category rather than that exact model, so it finds comparable gear alongside it.
Back protectors are worth wearing in the park and in rocky terrain, where they spread impact across a panel instead of concentrating it on one vertebra. The RECCO reflector in that group is a different thing entirely and needs care: it is a passive locator detectable only by a rescue team carrying a RECCO detector, and it is not avalanche safety equipment.
Helmets for backcountry touring
Two things change when you leave the ski area boundary. First, you are working hard uphill, so ventilation stops being a comfort feature and becomes the difference between a soaked base layer and a dry one at the transition. Second, if the objective includes a bootpack under a cliff band or any climbing, the hazard changes from a broad impact against snow to a sharp object landing on the crown of your head.
That second case is what dual certification is for. A helmet certified to both a ski standard and a mountaineering standard has passed a penetration test as well as an impact test, and it is the only sensible answer for ski mountaineering. The POC Obex BC MIPS is the pick here, and it also carries a RECCO reflector, which is worth being precise about.
Buying tips
- Buy new, always. A used helmet may have taken an impact that spent the foam with no visible sign, and there is no way to inspect for it. This is the one piece of ski equipment where the used market is a genuinely bad idea.
- Buy the helmet and goggles together if you can. The forehead gap problem is much easier to solve in a shop with both on your head than by ordering separately and hoping.
- Pre-season is when the range is complete. Helmet sizes sell out from the middle outwards, so a medium in a popular model disappears first. Buying ahead of the season is the difference between the helmet that fits and the one that is left.
- Check the ear pads are removable. Removable pads mean you can wash them, and they mean the helmet is usable in spring when full coverage is unbearable.
- Do not buy for growth. This applies to children especially. A loose helmet moves on impact, and a helmet that moves does less. Buy to fit now.
Where a helmet sits in the whole setup
A helmet is one line in a longer list, and the order in which you buy things matters more than the choice within any one category. The first resort ski setup puts a certified MIPS helmet on the list at under $100 alongside the boots, skis and layers, with a running total, and the buy-once resort setup steps up to the in-mould shell recommended above.
If you are pairing a helmet with goggles, the goggle roundup covers the lens question and the VLT chart gives the light-condition numbers in one table. And if you are shopping the whole kit rather than one item, the build guides hub compares both ladders side by side with totals.
Frequently asked questions
Is a more expensive ski helmet safer?
Not in any way you can measure from the price. Every snow helmet sold in the United States meets ASTM F2040 and every one sold in Europe meets CE EN 1077, and those standards are pass or fail rather than scored. Above roughly sixty dollars with a rotational-impact liner you are buying lower weight, better venting, more consistent fit across sizes and nicer materials. A well-fitted sixty dollar MIPS helmet protects better than a badly fitted three hundred dollar one, because fit is the variable that actually changes the outcome.
What does MIPS actually do?
MIPS is a low-friction layer between the shell and the head that allows a few millimetres of relative movement during an impact. Real crashes are almost never perpendicular: you hit the snow at an angle, and that angled impact generates rotational acceleration of the brain inside the skull, which is associated with concussion and more serious brain injury. The system is designed to reduce that rotational component. It adds roughly twenty to forty dollars to a helmet, which makes skipping it a false economy.
How do I tell if a ski helmet fits?
Put it on with no hat, tighten the dial until it is snug but not pinching, and then shake your head hard. The helmet should move with your head rather than sliding on it, and the front edge should sit roughly one to two finger widths above your eyebrows. With the goggles on there should be no gap between the goggle frame and the helmet brim: a gap there is both a cold stripe on your forehead all day and a sign the two do not match. If you can rock the helmet forward and back independently of your scalp, it is too big.
When should I replace a ski helmet?
Immediately after any significant impact, even if the shell looks undamaged. The expanded polystyrene liner absorbs energy by crushing, and it crushes once; a helmet that has taken a hard hit may be structurally spent with no visible sign. Absent an impact, most manufacturers recommend replacement every three to five years because the foam and the strap webbing degrade with UV exposure, sweat and heat cycling. Never buy a used helmet, because you cannot know what it has been through.
Do I need a different helmet for backcountry touring?
You need a dual-certified helmet if your objectives include a bootpack with rockfall overhead or any climbing. Ski certification tests for a broad impact from a fall; mountaineering certification adds a penetration test for a sharp object landing on the crown, which is what rockfall and ice are. A helmet certified to both covers the climb and the descent. For touring below treeline on rolling terrain, a normal ski helmet is adequate, and ventilation matters more than it does on a chairlift because you are working hard uphill.
Is a visor helmet a good idea instead of goggles?
For people who wear prescription glasses, often yes. A visor sits far enough off the face that glasses fit underneath without pressing against goggle foam, which is the single most common complaint from skiers who wear glasses. The trade-offs are real: a visor is more exposed to scratches than a goggle lens, replacements cost more, and you cannot swap tints as cheaply or as quickly to match the light. It is a comfort and convenience decision rather than a safety one.
How we choose: we compare published manufacturer specifications, published certification standards and verified owner reviews across retailers. We do not test equipment in person, and every figure quoted here is the manufacturer's published number unless we say otherwise. This is researched buying guidance and not professional instruction: binding release values are set by a certified technician on a calibrated jig, and avalanche terrain requires formal training and a current regional forecast that no article can replace.