The best snowboard bindings
The best all-round snowboard binding is a medium-flex model such as the Union Flite Pro at under $200, matched to a medium-flex board and sized to your boot rather than your shoe size. Snowboard bindings have no release mechanism and no DIN equivalent, so there is no calibration involved, unlike ski bindings which must be set on a jig by a technician.
The best snowboard binding for most riders is the Union Flite Pro at under $250, a medium flex model that matches the medium flex boards most people own and survives being ridden hard. For a first setup on a softer board, the Nitro Talent at under $250 is more forgiving while you are still learning to steer with the whole board. If strapping in sitting down is the part of the sport you like least, the Burton Step On Genesis at under $250 solves it, at the cost of committing to matched boots.
Bindings are where a lot of how a setup feels actually comes from, because they are the link between your ankle and the edge. They are also where the most common sizing mistake in snowboarding lives, which is buying by shoe size rather than by the boot that is going into them.
They do not release, and that is on purpose
There is no DIN on a snowboard, no release chart, no calibrated jig and no annual test. A binding is a fixed connection, and the reason is mechanical. A skier has each foot attached to a separate long lever, and a twisting fall loads a knee with exactly the torque an alpine binding is certified to release at. A snowboarder has both feet on one board, which cannot twist between them, so that injury mechanism does not act the same way, and a rider who came free of one binding mid-fall would generally be worse off.
The practical consequence is that mounting bindings is an adjustment job you can reasonably do yourself with a screwdriver, whereas setting a ski binding release value is not: on skis, the number must be set and then tested by a certified technician on a calibrated jig, because the torque a binding actually releases at drifts away from the number in the indicator window as it ages. The binding and DIN guide explains that properly for anyone who skis as well.
The picks, at three budgets
The ladder is green circle, blue square, black diamond, the same three tiers used across this site. Green is the forgiving first binding. Blue is the all-mountain default. Black is the step-in system for riders who value fast entry above flexibility in future boot purchases.
Snowboard binding picks

Nitro Talent Snowboard Bindings, medium
- Flex:
- Soft to medium
- Mount:
- Standard disc
- Size:
- Medium
A softer binding is more forgiving while you are still learning to steer with the whole board, and the standard disc fits every common mounting pattern. Match binding flex to board flex or one fights the other.
Best for: A first setup on a soft or medium board.
What it costs you: Soft bindings feel vague under an aggressive rider on a stiff board.
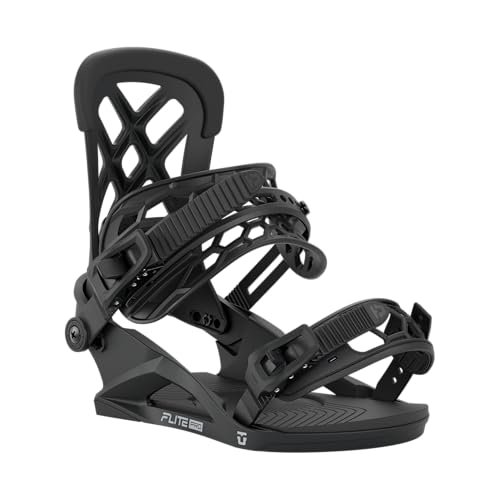
Union Flite Pro Mens Snowboard Bindings, large
- Flex:
- Medium
- Highback:
- Nylon composite
- Size:
- Large
Union builds bindings that survive being ridden hard, and the Flite Pro is the model that most park and all-mountain riders end up on. Medium flex matches the medium-flex boards most people own.
Best for: Most intermediate to advanced riders.
What it costs you: Check the size against your boot: a binding one size off never centres properly on the board.

Burton Step On Genesis Re:Flex Snowboard Bindings, large
- Entry:
- Step On
- Flex:
- Medium
- Boots:
- Step On boots only
Getting in standing up, in seconds, at the top of every run. If sitting down in the snow to strap in is the part of snowboarding you like least, this is the fix, and the connection is genuinely secure.
Best for: Riders who value fast entry and are buying boots at the same time.
What it costs you: Locks you into Step On boots, which is a real constraint on future purchases. Not compatible with any other boot you own.
Specifications are the manufacturer's published figures, not measurements we took. Sizes, prices and stock change constantly, so confirm on the retailer page before buying. We earn commissions from Backcountry and from qualifying Amazon purchases, and every link on this page is one or the other. Where a Backcountry button reads "shop the category" it opens a search for that category rather than that exact model, so it finds comparable gear alongside it.
How we chose
We compared published flex ratings, highback constructions, baseplate and cushioning designs, disc patterns and published boot size ranges across the range, then read verified owner reviews across retailers for the failures that specifications never mention: ratchets that skip under load, straps that ice up, and sizing that runs a half size off the published chart. We did not test these bindings in person and we do not claim to have.
Flex matching, which is the actual decision
| Board flex | Binding flex | What happens if you mismatch |
|---|---|---|
| Soft, park and learning | Soft to medium | A stiff binding overpowers the board, which twists and washes out |
| Medium, all-mountain | Medium | Either direction is tolerable. This is the forgiving middle |
| Stiff, freeride and big mountain | Medium stiff to stiff | A soft binding absorbs input before it reaches the edge, so the board feels vague |
Flex numbers are not comparable between brands, so a seven from one maker is not a seven from another. They are consistent within a brand, which is why buying board and bindings from the same manufacturer removes a variable for a first setup.
Sizing and centring
- Size to the boot. Every binding publishes a boot size range. Use it, and use your actual snowboard boot rather than your street shoe size, which runs differently. The snowboard size chart covers the board side of the same match, waist width by boot size.
- Check the heelcup adjustment. Most bindings have a sliding heelcup. Set it so the boot sits fully back against it with the toe just at the front of the baseplate.
- Centre the boot on the board. With the boot strapped in, toe and heel overhang should be roughly equal. Uneven overhang causes drag on one edge and wasted leverage on the other.
- Set the highback rotation. The highback should sit parallel to the heel edge of the board, which for a duck stance means rotating it. It transmits heelside pressure much better aligned than square to the binding.
- Set forward lean last. A little forward lean sharpens heelside response and a lot of it hurts your calves by lunchtime. Start with almost none and add.
Disc patterns and compatibility
Boards use a small number of insert patterns, and modern bindings generally ship with discs covering the mainstream ones. The place people get caught out is channel boards, which need the correct sliding disc, and older or brand-specific hardware. Check the compatibility statement before buying rather than after, because a replacement disc is a small and thoroughly avoidable expense.
While you have the screwdriver out: check your binding screws once or twice a season. They back out slowly under vibration, and a loose binding feels like a soft board or a bad edge, which sends people shopping for the wrong thing.
Step-in systems, honestly
The current generation works. The connection is secure, the response is genuinely comparable to strap bindings, and getting in standing up at the top of every run is a real quality of life improvement, particularly on a flat cat track or in deep snow where sitting down means digging yourself back out.
The cost is that the boots and bindings are a matched system, so your next boot purchase is constrained to that ecosystem. If you are replacing boots and bindings together, that is a much smaller concession than it appears. If you have boots you love, it is a poor moment to switch.
Where bindings sit in the setup
Boots first, then board, then bindings, and bindings last only because the first two constrain them. A boot that lets your heel lift ruins every turn regardless of what it is bolted into, and the boot outsole length also sets the board waist width you need. The boot roundup covers dual-zone lacing and reduced footprints, and the board roundup covers length from rider weight and waist width from outsole.
The board size calculator handles the numbers, the first resort setup prices a full kit with a running total including a wrist guard, which is the highest value protective item in the sport, and the renting against buying comparison covers whether you should be buying at all yet.
Boards these bindings suit

System MTN Snowboard Package with Bindings, 159 cm
- Length:
- 159 cm
- Includes:
- Board and bindings
- Camber:
- Camber
Board and bindings together, mounted and ready. For a first setup the package removes a compatibility question that trips people up, and it costs less than a bare board of similar quality.
Best for: A first board for a rider around 180 to 195 lb.
What it costs you: A 159 is a specific size, not a universal one. Check it against your weight, not your height.

Nitro Lectra Womens All-Mountain Snowboard, 149 cm
- Length:
- 149 cm
- Camber:
- Cam-Out hybrid
- Flex:
- Soft to medium
A hybrid camber profile is genuinely more forgiving for a learning rider: the rocker between the feet reduces edge catch and the camber underfoot keeps some grip on hard snow.
Best for: A learning to intermediate rider around 120 to 145 lb.
What it costs you: Soft flex washes out at speed on firm snow.

Burton Process Mens Snowboard, 152 cm
- Length:
- 152 cm
- Shape:
- Twin
- Flex:
- Medium
A medium-flex twin is the board that does the most things acceptably: park, groomers, and enough float to enjoy a storm day. The Process has been the reference in that description for years.
Best for: An intermediate rider around 130 to 155 lb who rides the whole mountain.
What it costs you: A twin is not a powder board and will not float like a directional shape.

Burton Instigator PurePop Camber Snowboard, 155W cm
- Length:
- 155 wide
- Camber:
- PurePop
- Waist:
- Wide
A wide board for a big boot, which is the specification riders with size 11 and up feet skip and then cannot work out why they catch a toe edge in every hard carve.
Best for: A rider with a US 11 boot or larger.
What it costs you: Slower edge to edge than a standard waist. Do not buy wide unless your boot needs it.
Specifications are the manufacturer's published figures, not measurements we took. Sizes, prices and stock change constantly, so confirm on the retailer page before buying. We earn commissions from Backcountry and from qualifying Amazon purchases, and every link on this page is one or the other. Where a Backcountry button reads "shop the category" it opens a search for that category rather than that exact model, so it finds comparable gear alongside it.
Frequently asked questions
Do snowboard bindings release in a fall?
No. A snowboard binding is a fixed mechanical connection with no release mechanism, no release standard and no certified setting. That is deliberate rather than an oversight. On skis, each leg is attached to a separate long lever, and a twisting fall generates exactly the torque that destroys a knee, which is why an alpine binding is a certified release device. On a snowboard both feet are attached to one board, the board cannot twist independently between them, and a released rider with one foot free is generally in more danger than one still attached. The practical consequence is that there is no DIN, no jig and no annual calibration on a snowboard setup.
How do I match binding flex to my board?
Match them, and when in doubt go slightly softer. A soft binding on a stiff board feels vague, because your input is absorbed by the binding before it reaches the edge. A stiff binding on a soft board overpowers it, so the board twists and washes out where it should be holding. Both feel like a board problem and neither is. Manufacturers publish a flex rating on a rough one to ten scale, and although the scales are not comparable between brands they are consistent within one, so a medium flex binding from the same maker as a medium flex board is a safe pairing.
What binding size do I need?
Size to your boot, not to your shoe size or to the board. Every manufacturer publishes a boot size range for each binding size, and a binding one size off never centres properly: too small and the boot sits proud of the heelcup with the straps at the end of their adjustment, too large and the boot moves inside the binding, which is a direct loss of the response you paid for. Then check the centring on the board itself, with the boot in the binding, so the toe and heel overhang are roughly equal. Uneven overhang is a toe drag on one side and wasted leverage on the other.
Will any binding fit any board?
Almost, but check the disc. The common mounting patterns are a four-hole insert pattern, a two by four pattern, and Burton channel systems, and most modern bindings ship with a disc or discs that cover the mainstream patterns. The compatibility gaps that still exist are usually around channel boards, where you need the correct disc to slide into the track, and around some older or brand-specific hardware. Read the compatibility statement before you buy, because a disc that does not fit turns a binding into an ornament, and buying a replacement disc separately is an annoying and avoidable expense.
Are step-in bindings any good now?
The modern step-in systems work well and they are a genuine convenience: you get in standing up, in seconds, at the top of every run, which is the part of snowboarding most riders like least. The connection is secure and responsive in a way the failed step-in designs of the past were not. The real cost is lock-in. A step-in system requires its own matched boots, so you are committing to one manufacturer for two of the three components of your setup, and any future boot purchase is constrained. If you are buying boots and bindings together anyway, that cost is lower than it looks.
What stance angles should I set?
Start at roughly fifteen degrees on the front foot and zero to negative six on the back, with a stance width close to shoulder width or whatever the reference marks on the board suggest. That is a duck stance and it is the sensible starting point for all-mountain riding because it lets you ride switch comfortably. Adjust from there based on what your knees tell you rather than what anybody recommends: angles that feel forced are angles that will hurt after a full day. Park riders tend towards more symmetrical duck, and carving riders tend towards both feet angled forward.
How we choose: we compare published manufacturer specifications, published certification standards and verified owner reviews across retailers. We do not test equipment in person, and every figure quoted here is the manufacturer's published number unless we say otherwise. This is researched buying guidance and not professional instruction: binding release values are set by a certified technician on a calibrated jig, and avalanche terrain requires formal training and a current regional forecast that no article can replace.