The best snowboard boots
The best snowboard boot for most riders is a dual-zone BOA model at under $250, because two independent lacing zones let you lock the ankle down hard while leaving the forefoot roomy, which is the most effective fix for heel lift and cold toes. Fit snug with the toes brushing the end when standing, since liners pack out up to a full size.
The best snowboard boot for most riders is a dual-zone BOA boot at under $250, because two independent lacing zones let you lock the ankle down and leave the forefoot alone, which is the single most effective fix for heel lift and for cold toes at the same time. A single-dial boot at under $250 is a fine first pair. If you are on the boundary of needing a wide board, a reduced-footprint boot at under $500 can buy about a size of toe-drag relief.
Boots are the first purchase in snowboarding and the one worth the most attention, for the same reason they are in skiing: they are the only part of the setup shaped around you specifically, and no board or binding compensates for a boot that does not hold your foot.
Heel lift is the problem
Every toeside turn you make is a matter of pressing through the ball of your foot while your heel stays planted, so that the whole boot rotates the board onto its edge. If the heel rises instead, part of that input is absorbed inside the boot and arrives at the edge late and diminished. The turn feels vague and slow to initiate, and riders reliably blame the board.
The secondary effects are worse in their own way. A lifting heel means your toes are gripping all day to stabilise the foot, which is why some riders get calf cramp and forefoot pain that they interpret as a boot being too tight, and then loosen the boot, which makes the heel lift worse. It is also a leading cause of blisters at the back of the heel.
Dual-zone lacing is the direct fix. Lock the upper zone hard around the ankle, which is what holds the heel down, and leave the lower zone comfortable across the forefoot, which is what keeps blood flowing to your toes. A single-zone system cannot do both at once and forces a compromise between a held heel and a crushed forefoot.
The picks, at three budgets
The ladder is green circle, blue square, black diamond, the same three tiers used across this site. Green is the first pair with a single dial. Blue is dual-zone lacing with a heat mouldable liner, which is the boot most riders should own. Black is the reduced-footprint option for anybody fighting toe drag.
Snowboard boot picks

DC Mens Phase BOA Snowboard Boots
- Lacing:
- Single BOA
- Flex:
- Soft to medium
- Liner:
- Standard
A single BOA dial tightens the whole boot with a gloved hand in the cold, which is worth more day to day than any performance claim. Soft flex suits a rider still learning.
Best for: A first pair of boots.
What it costs you: A single zone means you cannot tighten the ankle independently of the forefoot, and heel lift is the usual result.

DC Mens Phase BOA Pro Snowboard Boots
- Lacing:
- Dual BOA zones
- Flex:
- Medium
- Liner:
- Heat mouldable
Two zones let you lock the ankle down hard and leave the forefoot roomy, which is the single most effective fix for heel lift and for cold toes. The mouldable liner then takes the shape of your foot.
Best for: Most intermediate riders, and anyone fighting heel lift.
What it costs you: More mechanism to fail, and BOA cables do eventually need replacing.

Burton Mens Moto BOA Snowboard Boots, size 10
- Lacing:
- Single BOA
- Flex:
- Medium
- Footprint:
- Reduced
The reduced footprint is the reason this is here: a shorter outsole for the same internal size buys about a size of toe-drag relief, which can be the difference between needing a wide board and not.
Best for: A rider on the edge of needing a wide board.
What it costs you: Sold per size, and a single BOA zone at a mid-range price. Note this listing is one size.
Specifications are the manufacturer's published figures, not measurements we took. Sizes, prices and stock change constantly, so confirm on the retailer page before buying. We earn commissions from Backcountry and from qualifying Amazon purchases, and every link on this page is one or the other. Where a Backcountry button reads "shop the category" it opens a search for that category rather than that exact model, so it finds comparable gear alongside it.
How we chose
We compared published lacing systems and zone counts, liner constructions and mouldability, stated flex, outsole footprint claims and published size ranges across the range, then read verified owner reviews across retailers for the things a specification never covers: whether a liner packs out unusually fast, whether a size runs long or short, and how BOA cables and reels hold up over a season. We did not test these boots in person. Note that several listings here are size specific, so check the size in the product name before ordering.
Fitting a snowboard boot, in the shop
- Go in the afternoon, in one thin sock. Feet swell through the day, and a boot fitted to a morning foot in a thick sock is a boot that hurts in the afternoon.
- Stand upright with the boot laced properly. Your toes should just brush the end. Not curled, not pressing hard, but definitely touching.
- Flex into a riding stance. Your toes should pull back off the end. If they never touched at all, the boot is too big and will be far too big after it packs out.
- Check the heel. Flex forward hard and have somebody watch your heel, or feel for it. It should stay planted. If it lifts, try the upper zone tighter, then try a different boot.
- Walk around for ten minutes. Pressure points do not appear instantly. A hot spot at ten minutes is a blister at ten in the morning.
- Ask about heat moulding. A mouldable liner takes your shape in twenty minutes rather than ten riding days, and it is often included with the boot.
Snug is fixable and painful is not. Pack-out will loosen a snug boot. Nothing makes a boot that is hurting a specific spot in the shop stop hurting on the hill.
Outsole length decides your board
The boot outsole is the footprint that sits on the board, and it, rather than your shoe size, is what determines the waist width you need. Too much overhang and your toe or heel contacts the snow before the edge does in a hard carve, which stops the turn dead. That is the mechanism behind toe drag, and it is a sizing problem rather than a technique problem.
| Boot size, US mens | Board waist | Note |
|---|---|---|
| Up to 8 | Narrow to standard | A wide board is slow edge to edge and tiring for a small foot |
| 8 to 10.5 | Standard | The mainstream. Almost every board is built for this |
| 11 to 11.5 | Mid-wide, or standard with a reduced-footprint boot | This is the band where a shorter outsole genuinely changes the answer |
| 12 and up | Wide | Not optional. Check the published outsole length in centimetres |
The board size calculator takes weight and boot size together, the snowboard size chart lists waist width in millimetres for every boot size, and the board roundup includes a wide option for exactly this reason.
Flex, and what it changes
Boot flex works the same way binding flex does: match it to the board and to how you ride. A soft boot is forgiving, easier to steer at low speed and better for park, and it folds under an aggressive rider on a stiff board. A stiff boot transmits input immediately and is tiring and unforgiving for someone still learning. Medium is where most riders belong and where most boots are built.
Flex ratings are not comparable between brands, which is worth remembering when reading reviews. Within a brand they are consistent, so a medium boot, medium binding and medium board from similar tiers is a reliable pairing when you have no other information.
The cheapest protective purchase in snowboarding
Wrist fractures are the most common snowboard injury by a substantial margin, because a learning rider catches a heel edge, falls backwards and puts a hand down. A wrist guard worn under a glove costs under thirty dollars and addresses the most likely way you get hurt, which makes it the best value item on this entire site.
Protection worth adding
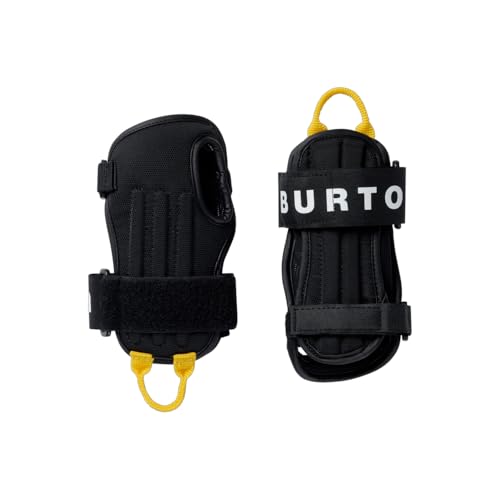
Burton Impact Wrist Guard
- Type:
- Wrist splint
- Fit:
- Under glove
- Use:
- Snowboarding
Wrist fractures are the most common snowboard injury by a wide margin, because a beginner falls backwards and puts a hand down. Twenty-seven dollars against the most likely injury in the sport is the best value purchase on this site.
Best for: Every learning snowboarder, without exception.
What it costs you: Slightly restricts wrist movement, which is the mechanism by which it works.

Qunature Ski Back Protector Vest
- Type:
- Vest with removable pad
- Fit:
- Under jacket
- Panel:
- Detachable
A back protector spreads impact across the panel instead of concentrating it on one vertebra. Park riders and anyone hitting features should wear one, and the removable panel means one vest for two use cases.
Best for: Park riding, and anyone skiing terrain where a backwards fall onto rock is plausible.
What it costs you: Warm, and does nothing for a rotational or compressive spinal injury.

RECCO Rescue Reflector
- Type:
- Passive reflector
- Power:
- None required
- Detection:
- RECCO detector only
A passive reflector that organised rescue services can detect with a RECCO unit. It needs no battery and never fails, and it is genuinely useful for locating a body in a tree well or a slide path.
Best for: Adding to a helmet or jacket that does not already have one.
What it costs you: This is NOT avalanche safety equipment and it does not replace a transceiver. It only works once a rescue team with a detector arrives, and companion rescue in the first fifteen minutes is what actually saves lives.
Specifications are the manufacturer's published figures, not measurements we took. Sizes, prices and stock change constantly, so confirm on the retailer page before buying. We earn commissions from Backcountry and from qualifying Amazon purchases, and every link on this page is one or the other. Where a Backcountry button reads "shop the category" it opens a search for that category rather than that exact model, so it finds comparable gear alongside it.
A helmet goes with it. The helmet roundup covers what certification does and does not tell you, and why a well-fitted sixty dollar helmet with a rotational-impact liner protects better than a badly fitted expensive one.
Where the boots sit in the setup
First. Buy boots, then the board sized to your weight and your outsole, then bindings sized to the boot. The binding roundup covers flex matching and centring, the first resort setup prices a full kit with a running total, and the renting against buying comparison explains why boots cross over from rent to buy years before anything else does.
Frequently asked questions
What is heel lift and why does it matter so much?
Heel lift is your heel rising off the footbed inside the boot when you flex forward or press onto a toe edge. It matters because everything you ask the board to do on a toeside turn is transmitted through your heel staying planted, so a lifting heel means your input arrives late and weaker than you intended. It also causes blisters and calf fatigue, because you are gripping with your toes all day to compensate. The most effective fix is a boot with two independent lacing zones, so you can lock the ankle down hard without crushing the forefoot, which is exactly what single-zone lacing cannot do.
How should a snowboard boot fit?
Snug enough that your toes brush the end when you stand upright and pull back off it when you flex into a riding stance. That toe brush surprises people who are used to buying shoes, but a liner packs out by up to a full size over the first several days of riding, so a boot that is comfortable in a shop is loose by the end of the first week. Your heel should stay planted when you flex forward, there should be no pressure points anywhere, and you should be able to wiggle your toes slightly. Buy in the afternoon when your feet are at their largest, and wear one thin sock.
BOA, speed lace or traditional laces?
BOA is a dial that tightens a steel cable, and it is the easiest to operate with cold gloved hands and the easiest to adjust mid-run. Its weakness is that a single dial tightens everything evenly, which is why dual-zone versions exist. Speed lacing uses pull cords and gives slightly more feel for how tight each zone is. Traditional laces are the most adjustable of all, cheap to replace and slowest to use, and they loosen over the day. For most riders a dual-zone BOA is the best combination of speed and control, and the ability to retighten in ten seconds on a chairlift is worth more than it sounds.
How does boot size affect my board?
Through outsole length, which sets the waist width you need. Your boot outsole is the actual footprint of the boot on the board, and if it overhangs the edges too far your toes or heels drag in the snow before the edge engages in a hard carve, which stops the turn. Roughly speaking, a US mens 11 and above generally needs a wide board. A reduced-footprint boot shrinks the outsole for the same internal volume and can buy about a size of relief, which is sometimes the difference between needing a wide board and not. Always check outsole length in centimetres rather than assuming from shoe size.
Do snowboard boots need breaking in?
They pack out rather than break in, which is a different process. The liner foam compresses under your foot over the first several days of riding, and a boot can lose up to a full size of internal volume in the process. That is why the fitting rule is a snug boot with the toes brushing the end when standing. Heat mouldable liners accelerate the process: a shop can heat the liner and have you stand in it in a riding stance, so it takes your shape in twenty minutes instead of ten days. If a boot is genuinely painful in the shop, it will still be painful later. Pack-out fixes tightness, never pain.
How long do snowboard boots last?
Somewhere between fifty and a hundred and fifty riding days depending on how hard you are on them, and the liner fails long before the shell does. The symptom is a boot that no longer holds your heel down however hard you crank the lacing, because the liner has packed out past the point the adjustment can take up. That is a genuine performance problem rather than a comfort one, and it is worth replacing at that point. Replacement liners exist and are worth considering if the shell is still in good shape and the fit was good to begin with.
How we choose: we compare published manufacturer specifications, published certification standards and verified owner reviews across retailers. We do not test equipment in person, and every figure quoted here is the manufacturer's published number unless we say otherwise. This is researched buying guidance and not professional instruction: binding release values are set by a certified technician on a calibrated jig, and avalanche terrain requires formal training and a current regional forecast that no article can replace.